Virtual Staging for Real Estate Photos: A Practical Guide
Learn how virtual staging for real estate photos works, from choosing rooms and adding furniture to disclosure rules and final quality checks.
In 2025, 83% of buyers' agents said staging made it easier for buyers to visualize a property as their future home, in the National Association of REALTORS® 2025 Profile of Home Staging. That figure measures confidence, not closing prices; it does not prove staged photos raise offers or cut days on market. Treat virtual staging for real estate photos as an orientation tool with a hard edit boundary: furnish the room, leave walls and windows alone, label every staged image, and test before publishing whether it earns more showings.
Which Rooms to Stage First
Start where buyers try hardest to place their own furniture. In the National Association of REALTORS® 2023 Profile of Home Staging, 39% of buyers' agents cited the living room as the most important space to stage, followed by the primary bedroom at 36% and the kitchen at 30%. The same survey found 77% of buyers' agents considered listing photos a more important or much more important marketing element for clients, so the first clear photo of each key room carries disproportionate weight.
Room Priority and Staging Scope
| Room | Buyers' agents ranking it most important | Stage with | Keep in mind |
|---|---|---|---|
| Living room | 39% | Sofa, area rug, coffee table, lamps | Usually the first room buyers judge the home by |
| Primary bedroom | 36% | Queen or king bed sized to the room, nightstands, one dresser | Leave walking space around the bed |
| Kitchen | 30% | Counter stools or a set dining table, a fruit bowl, a few counter accents | Do not add appliances or change cabinets |
| Dining room | Not ranked in the top three | Dining table for six or fewer, chairs | Add only if the room clearly reads as a dining space |
A living room needs enough furniture to show conversation and traffic flow, not a showroom. Anchor seating on the rug, leave the entry path open, and keep lamps where outlets could plausibly serve them.
A primary bedroom sells rest and storage. Use a bed that fits the room, a nightstand on each side when space allows, and one dresser only if the wall can take it without squeezing the walkway.
Kitchens need restraint. Stools prove the island works, a set table proves eating space, and a fruit bowl adds color. Don't invent appliances, swap cabinets, or cover the counters buyers want to inspect.
Sellers who want broader preparation beyond photos can compare this photo-first sequence with home staging advice for Canadian sellers from Royal LePage Brookside Realty.
Practical rule: Stage the living room, primary bedroom, and kitchen before you spend anything on secondary rooms.
How to Virtually Stage a Photo Step by Step
Work in this order. Original first, furniture second, disclosure before publication. If you reverse that sequence, errors get baked into the file and become harder to spot.
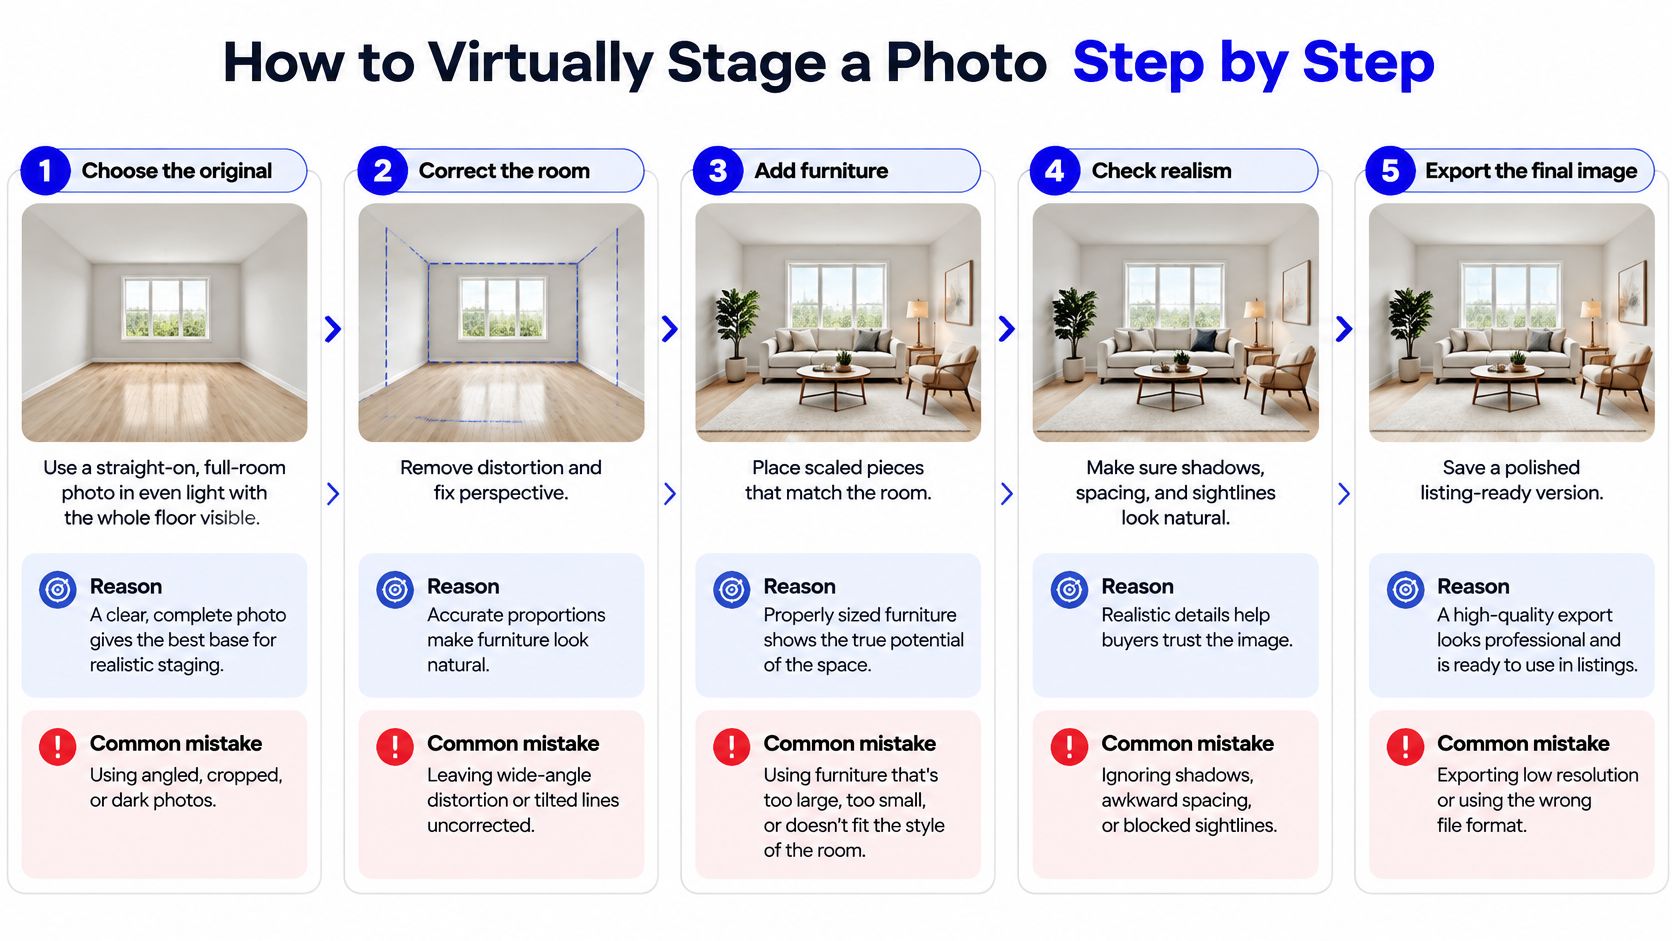
- Choose the original. Pick a straight-on, full-room photo in even light with the whole floor visible. A tight crop or skewed angle forces the tool to guess at corners, and that guesswork shows up as warped furniture.
- Correct exposure and lens distortion only. Straighten verticals and balance light without touching walls, windows, floors, or ceilings. Before this step, read the edit boundary table in the next section, which defines what can and cannot change.
- Save the untouched original with a source-image ID. Keep the edit history and disclosure text with it, following the workflow in Canopy MLS guidance on virtually staged and AI-enhanced images. Every staged version should trace back to that file in seconds.
- Add movable furniture and décor only. Use a tool that keeps openings, massing and storey heights from the source photo while generating materials, light, and setting around them. The common slip is letting software widen a window or shift a door to fit a sofa.
- Render two or three buyer-relevant styles. Try modern neutral, traditional, and casual family versions of the same room. You're showing a range of plausible uses, not imposing one taste, and exterior views can be handled with the same source-first discipline described for 3D landscape design software.
- Check every output before you use it. Look for floating furniture, wrong scale, blocked doors, invented windows, and finishes that aren't in the original. Zoom in at floor contact points, where bad renders usually fail first.
- Pair and label before publishing. Place each staged image beside its original and write the disclosure label now, not after upload. A buyer should be able to compare the furnishing concept with the actual room without hunting through captions.
The One-Line Test
If a buyer walked in tomorrow, would the room match the photo except for movable furniture?
If the answer is no, you've edited the property, not staged it. Go back to the original and rebuild from there.
Edit Limits and Disclosure Rules for Staged Photos
Moving a sofa into a photo is staging. Moving a window is misrepresentation. That distinction sounds obvious until a tool brightens a room by enlarging the glass, replaces worn flooring, or removes a stain while placing a rug.
Allowed and Risky Virtual Staging Edits
| Edit | Usually allowed? | Why it matters |
|---|---|---|
| Movable furniture and décor | Yes | Shows how the room could be used without changing the property |
| Wall, floor or ceiling finishes | No | Changes the condition a buyer will see in person |
| Windows, doors and fireplaces | No | Adding or removing openings misrepresents the home |
| View through a window | No | Changes the appeal of the lot |
| Driveway, grading or landscaping | No in many markets | Exterior ground changes are often barred by MLS rules |
| Apparent renovation, such as new cabinets | Higher risk | Treat as a material alteration and disclose it |
Disclosure rules vary by market. Florida Realtors guidance on virtual staging advises agents to label virtually staged images, retain or provide the original photograph, and avoid changes that alter room dimensions or conceal defects. California requires listings using digitally altered images to disclose the alteration and provide access to the original, unaltered photos. The same source notes 58% of surveyed real-estate professionals reported that buyers were disappointed when properties did not match television-style expectations.
Our own policy follows the same line. Outputs may not be presented misleadingly, such as an unedited photograph of an existing building or as a promise of how a planned building will look or comply with regulations. If you're unsure where rendering ends and photography begins, an explanation of photo rendering clarifies that boundary.
Check your local MLS, brokerage, advertising, and consumer-protection requirements before publishing. This is orientation, not legal advice, because placement rules for labels and originals differ by jurisdiction.
A clear label and a visible original don't weaken a listing. They prevent the showing from starting with an apology.
Furniture Scale and Style That Look Real
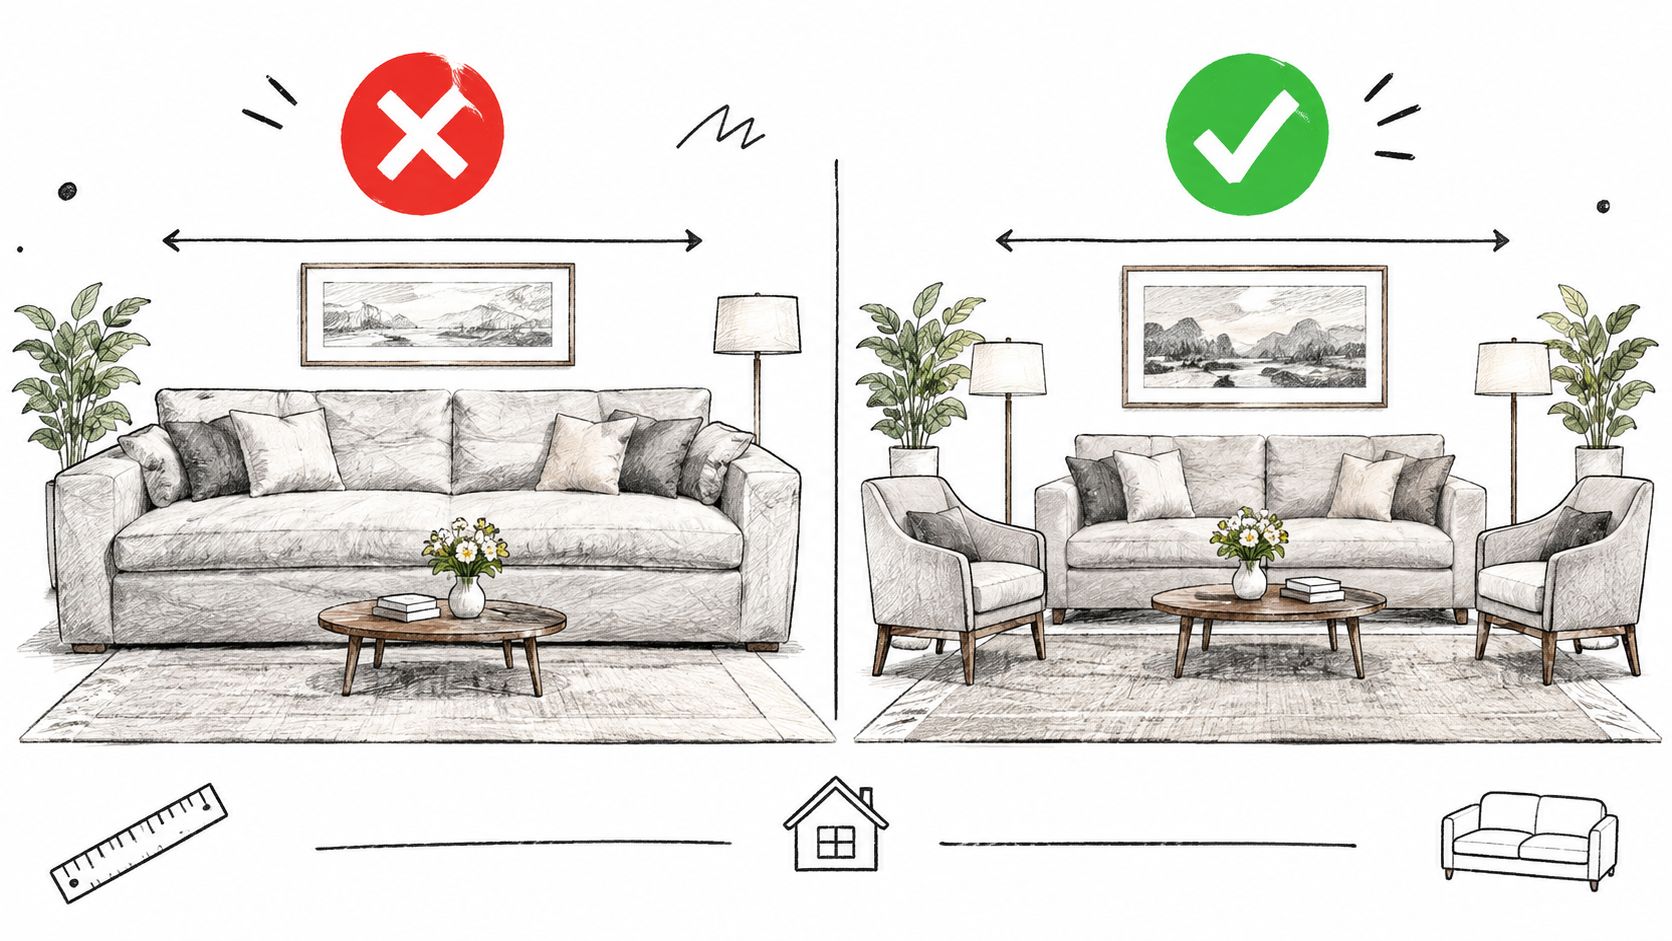
Scale errors expose a fake faster than style does. An oversized sofa in a small living room, a bed that leaves no usable walkway, or a tiny rug under floating chair legs tells buyers the image can't be trusted.
Known Furniture Placement Rules
| Item | Placement rule |
|---|---|
| Area rug | Front legs of sofa and chairs sit on the rug |
| Nightstand | Top level with the top of the mattress |
| Bed frame | Leave clear walking space on both sides and at the foot |
| Three-seat sofa | Leave visible floor at both ends and keep the main walkway open |
| Dining table for six | Leave room to pull every chair out without touching a wall |
Density matters as much as individual pieces. Stage what a buyer would expect for the room's size and the home's price tier, and leave enough visible floor that its dimensions still read. If every wall is lined with furniture, the room looks smaller and the buyer can't judge where their own pieces would go. Room-by-room examples in this living room staging guide show how much empty floor to preserve.
Style should match the neighborhood and price point. Luxury styling in a starter home creates a promise the finishes can't keep at the showing. I would pick one palette per home, repeat it across rooms, and avoid mixing a formal living room with a rustic bedroom.
Field check: Stand where the camera stood and compare the gaps in the photo with standard furniture sizes. If a normal piece wouldn't fit, resize it before rendering.
Review Staged Photos Before You Publish
Run this checklist on every image, not just the hero shot. One bad detail can undermine the whole set.
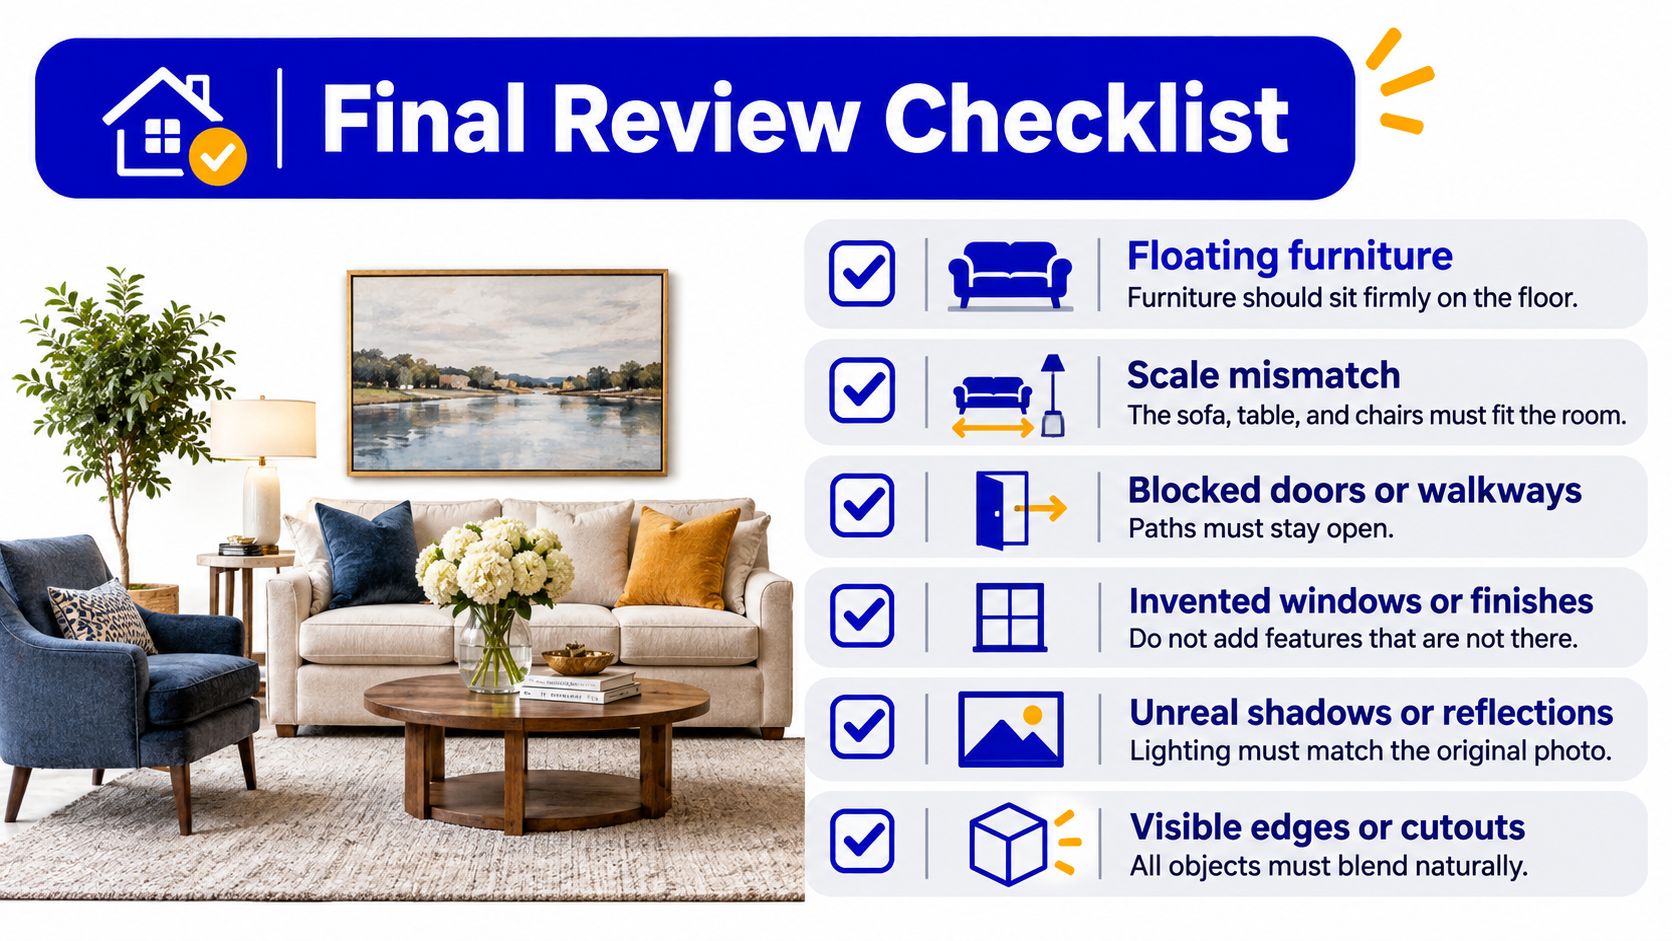
- Floating furniture: Legs and bases sit on the floor with contact shadows that match the room's light.
- Scale mismatch: Sofas, beds, and tables match the placement rules and leave walkways open.
- Blocked doors or paths: Every door swings clear and no piece blocks a hallway, closet, or fireplace.
- Invented features: No added windows, finishes, fixtures, views, or appliances appear.
- Inconsistent lighting: Furniture highlights and shadows come from the same direction as the room's windows.
- Missing disclosure: The label is visible on the image and the original is one tap away.
Test Whether Staging Helps This Listing
Keep price, copy, photo order, exposure, and lead source constant. Vary only the hero image, or compare staged and unstaged versions of one room set, then measure click-through rate, saved listings, showing requests, offer rate, days on market, and achieved price relative to asking. Segment results by vacant versus occupied homes, room type, market, and furnishing style, and keep a holdout group before claiming a gain.
That caution matters because the strongest outcome figures measure staging broadly. Reporting on the National Association of REALTORS® 2025 survey of approximately 1,200 real-estate professionals found 83% of buyers' agents said staging made it easier for buyers to envision a property as their future home. That measures perceived visualization, not causal sales uplift from virtual staging alone.
Over-staging is the main pitfall. Unrealistic density or luxury styling inconsistent with the neighborhood produces mismatched tours that waste everyone's time. Before you publish, it's also worth understanding MLS listing agreements from Homes By Carmen, so photo obligations and marketing permissions are clear.
Decide Which Listings to Stage First
Use a simple decision rule. If the home is vacant, stage the living room, primary bedroom, and kitchen first, using the room scopes and furniture clearances already set out. Those rooms answer the buyer's first questions about gathering, sleeping, and cooking.
If the home is occupied and furnished, skip virtual staging for those rooms. Spend the budget on better photography and lighting instead, because replacing real furniture digitally adds disclosure work without adding information. Our Virtual Staging furnishes and stages a photo of an empty room, keeping the walls and windows where they are, and StageHQ, a sister product of mnml.ai, furnishes an empty room from one photo for real estate agents and delivers it with the MLS disclosure badge.
If the home sits in a high price tier, test before you roll out. Run staged versus unstaged photos on a few listings, because the available evidence doesn't prove an automatic price premium. Investor listings need the same discipline, whether you're preparing a local flip or reviewing a Destin investment property for sale from Dream Destin Realty as a comparable marketing example.
Compare cost before committing. Weigh any virtual staging quote against physical staging quotes for the same rooms and against the staff time a proper test requires. A cheap render that needs three revisions and a compliance fix isn't cheap.
Three Actions This Week
- Pick one empty listing and choose the living room, primary bedroom, and kitchen set.
- Run the review checklist on every staged image, including the link back to the original.
- Write the disclosure label and caption stating which edits were made, then publish only if both pass.
Revisit the decision when the test window closes. Compare saves, showings, and offers with the unstaged control, and expand only if the staged set produced better qualified interest, not just more clicks.
Stage your next vacant listing from a single photo while keeping its walls, windows, and proportions intact, then review style variants side by side before you publish with a clear disclosure. Try the workflow on one living room, bedroom, and kitchen set at mnml.ai and measure the result against your unstaged originals.